Are you wrestling with the challenge of remotely accessing your Raspberry Pi's graphical interface? Successfully connecting to your Raspberry Pi using VNC Viewer requires a meticulous approach to configuration, password management, and network setup.
Many users, especially those new to the Raspberry Pi ecosystem, encounter roadblocks when attempting to establish a VNC connection. The process, while straightforward in concept, demands attention to detail. From ensuring the VNC server is correctly installed and running on the Raspberry Pi to navigating the intricacies of network addressing and security protocols, each step is crucial. The goal is to create a seamless remote desktop experience, allowing you to control your Raspberry Pi from the comfort of your laptop or other device.
The journey to remote access begins with the Raspberry Pi itself. This compact computer, beloved by hobbyists and professionals alike, offers immense potential for projects and applications. The ability to control the Raspberry Pi remotely, without being tethered to a monitor, keyboard, and mouse, is a significant advantage. This is where VNC (Virtual Network Computing) comes in, acting as a bridge between your device and the Raspberry Pi's graphical environment.
- Bollyfix Movie Your Ultimate Destination For Bollywood Entertainment
- Bollywood Bollyflix Your Ultimate Guide To Streaming Indian Cinema
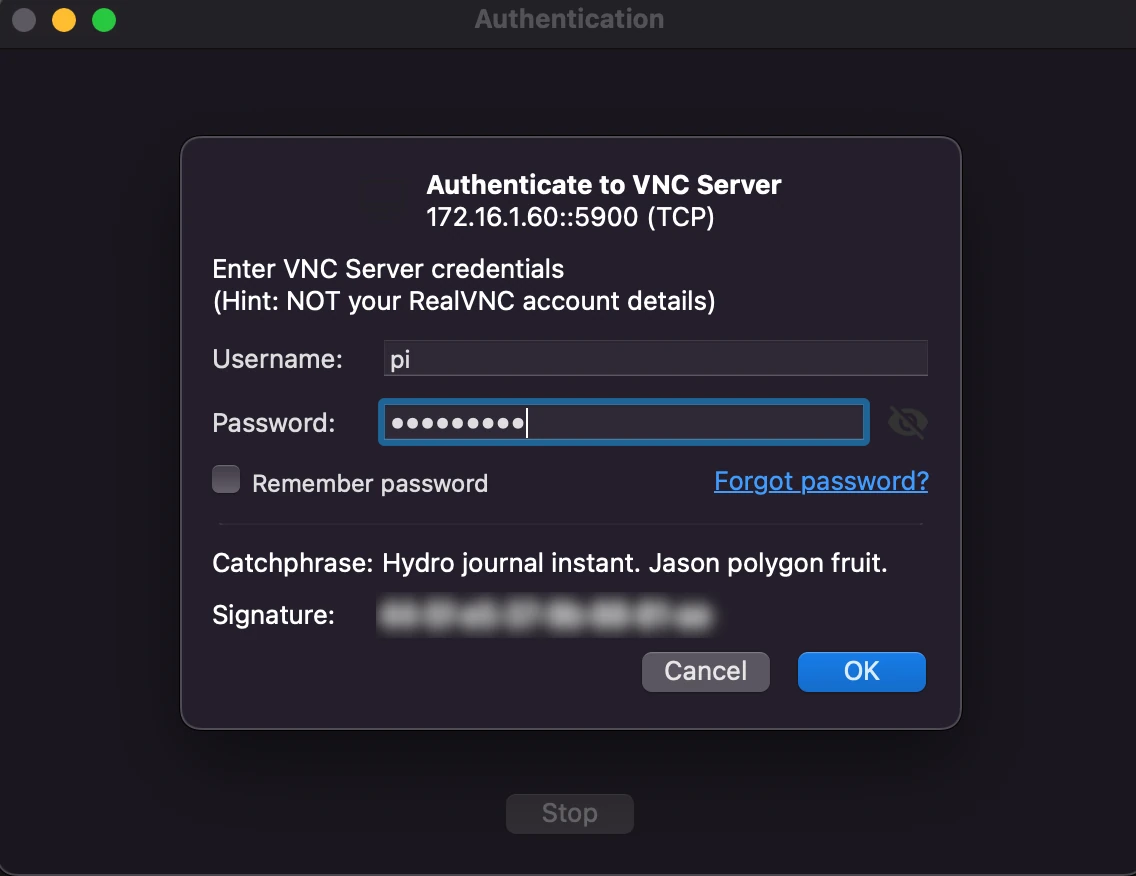
Let's consider a typical scenario. You have a Raspberry Pi 3, running the latest version of Raspberry Pi OS (formerly Raspbian), and a laptop. You want to connect to the Raspberry Pi over your home Wi-Fi network using VNC Viewer. You type the VNC address, typically the Raspberry Pi's IP address followed by a port number like 5900, into the VNC Viewer. But what happens next? More often than not, you're met with a login screen, prompting you for a username and password. This is where the real work begins.
The initial configuration of the VNC server on your Raspberry Pi is paramount. This involves installing the necessary software, typically a VNC server such as TightVNC or RealVNC Server. After the installation, you will need to configure the VNC server. This process usually entails setting a password. Remember that this password is not the same as the user password you use to log in to the Raspberry Pi's terminal or graphical interface directly. This VNC password is specifically for remote access.
Once the VNC server is up and running, you'll need to determine your Raspberry Pi's IP address. This address is the key to the connection. You can usually find it by typing `ifconfig` into the Raspberry Pi's terminal. The IP address is the one listed under `inet` for your Wi-Fi or Ethernet connection. Then, youll enter this IP address, followed by a colon and the display number (usually `:1` or `:0`), into your VNC Viewer application on your laptop. The format typically looks like: `[email protected]:5901` or `[email protected]:1`. The number at the end indicates the display port.
- Bollyflix Final Destination Your Ultimate Guide To Streaming Bollywood Movies
- Aagmalcom Your Ultimate Gateway To Exclusive Deals And Discounts
However, the process doesn't end there. Security is a major concern when remotely accessing your Raspberry Pi. Opening ports on your device, as VNC and SSH do, potentially exposes it to the outside world. Hackers actively search for devices with open ports and default passwords. Therefore, it is essential to change your password as soon as you enable VNC. It is also highly recommended to change your Raspberry Pi's user password.
A comprehensive setup frequently involves customizing the Raspberry Pi OS itself. This might include enabling SSH (Secure Shell) for secure terminal access, configuring Wi-Fi settings, setting a static IP address, and defining the country/locale for optimal performance and user experience. Advanced users might further refine the configuration, delving into the realms of port forwarding on their router to access the Raspberry Pi from outside their home network. This step-by-step approach is recommended, from the basic setup to more elaborate configurations.
The VNC password is independent of the standard user login password. Some users make the mistake of trying their regular user password when prompted by VNC. The correct approach is to enter the specific password you set up for VNC access during the server configuration. After successfully authenticating, you should be presented with the Raspberry Pi's desktop environment.
For those encountering login screen difficulties even with the correct username and password, additional troubleshooting steps are necessary. Check your VNC server configuration on the Raspberry Pi, verify your network settings, and, if necessary, consult the Raspberry Pi's documentation. Remember that the VNC server might have its own password, separate from the user's password.
Consider the experience of setting up VNC on a Raspberry Pi 5 running the latest OS Bookworm. The installation process will be similar, though the specific commands or interface elements might vary slightly. The basic steps remain consistent. You need to install a VNC server, configure its settings, and then connect through a VNC client on your laptop or another device. RealVNC is a popular choice because of its ease of use.
For those seeking an alternative, consider SSH tunneling. SSH provides a secure channel for remote access and can be used to forward the VNC connection. This is a good option to bypass firewall issues.
Here is a summary of common problems and their solutions:
- Black Screen: Ensure the VNC server is running correctly on the Raspberry Pi. Double-check the display settings within the VNC server configuration.
- Lag: Reduce the desktop resolution or color depth in the VNC client to improve responsiveness. Make sure both your Raspberry Pi and your client machine are using a strong, stable network connection.
- Login Screen Loop: Verify the username and password. Make sure you are using the VNC server password and not the Raspberry Pi user password. Re-configure your VNC server and ensure all settings are correct.
- Connection Refused: Check the Raspberry Pi's IP address and that the VNC server is listening on the correct port. Double-check that you have the right IP address and port number.
Let's break down the typical steps to set up VNC on your Raspberry Pi.
- Install a VNC server: You can use RealVNC, TightVNC, or TigerVNC. The RealVNC server is a popular choice because it's easy to set up and maintain. Use the following command to install RealVNC:bashsudo apt updatesudo apt install realvnc-vnc-server
- Enable VNC: RealVNC is a great choice because its simple setup wizard. You can use `raspi-config` (available in the terminal) or the Raspberry Pi configuration tool. Navigate to 'Interface Options' and enable VNC. bashsudo raspi-configThen, select 'Interface Options' and enable VNC.
- Set a Password: If you are using RealVNC server, set a secure password during the setup process or within the VNC server settings. bash vncserver -passwd
- Find your IP address: You can locate your Raspberry Pi's IP address by typing `ifconfig` in the terminal. Note the address listed under `inet`.bashifconfig
- Connect with VNC viewer: In the VNC viewer on your laptop or computer, type in the IP address of your Raspberry Pi followed by a colon and the display port (usually `:1` or `:0`). Use the password you set earlier. For example: `[email protected]:1`.
Once the setup is done, and the connection is established, you might find that the initial display size is smaller than you'd like. You can adjust the screen size within the "Raspberry Pi Configuration" and within the "Display" tab. This might require a restart of the Raspberry Pi to apply the new settings.
Security is a critical concern. Ensure that you change the default password for both your Raspberry Pi user account and your VNC connection. Furthermore, keep your Raspberry Pi's software up-to-date by running regular updates and upgrades.
So, as you embark on your remote access journey, remember the essentials: correct installation and configuration of the VNC server, secure password management, and a stable network connection. With these fundamentals in place, you'll be well on your way to unlocking the full potential of your Raspberry Pi from anywhere.
- Unveiling The World Of Vegamovie 18 The Ultimate Guide For Movie Buffs
- Bollyflixphd The Ultimate Guide To Streaming Bollywood Movies