Can you truly harness the power of your Raspberry Pi from anywhere, without being tethered to a monitor or keyboard? The answer is a resounding yes, thanks to the magic of Virtual Network Computing (VNC), a technology that allows you to remotely access and control your Pi's desktop environment. This opens up a world of possibilities, transforming your compact computer into a versatile tool accessible from the comfort of your couch, across the room, or even across the globe.
At its core, VNC works by mirroring the graphical output of your Raspberry Pi's desktop onto a remote device, such as your laptop, tablet, or smartphone. Simultaneously, it transmits your keyboard and mouse inputs back to the Pi, effectively giving you complete control as if you were sitting right in front of it. This elegant solution eliminates the need for physical peripherals, making your Pi a truly portable and accessible device.
| VNC on Raspberry Pi: Key Information | |
|---|---|
| Technology Overview | Virtual Network Computing (VNC) is a system that allows you to remotely control a computer using the RFB (Remote Framebuffer) protocol. |
| Client Devices | Laptops, desktops, tablets, and smartphones - any device with a VNC client application. |
| Server Device | Raspberry Pi. |
| Functionality | The client transmits keyboard and mouse actions to the server (Raspberry Pi). The server executes those actions and transmits the screen output back to the client. |
| Primary Uses | Remote access, headless operation, GUI control without physical peripherals. |
| Display Ports | By default, the first display port is :1, accessible through port 5901. Additional instances of the server can run on ports :2 (5902), :3 (5903), and so on. |
| Operating System Compatibility | VNC is platform-independent, meaning it can work across various operating systems on both the client and server sides. |
| Security Considerations | It is essential to secure the connection, including changing the default password and not exposing the VNC port to the internet directly without additional security measures (like SSH tunneling). |
| Example Configuration | To connect to a VNC server on your Raspberry Pi, type in the IP address of your Pi and port. For example, if your Pi's IP address is 192.168.1.100, the port would be 5901. So the address would be 192.168.1.100:5901. If you are using a different display port you would need to change the port number such as 5902, 5903, etc. |
For additional information, please refer to RealVNC official website
- Sone 436 Unlocking The Mystery And Potential Of This Trending Phenomenon
- Hd Hub 4u Adult A Comprehensive Guide To Understanding And Exploring
Now, let's delve into the practicalities of setting up and using VNC with your Raspberry Pi. The journey begins with installing a VNC server on your Pi. Several options exist, but RealVNC Server is a popular and user-friendly choice, especially for beginners.
Once the VNC server is installed, the next step is configuration. This ensures that your Pi is ready to accept incoming connections. If you have already installed the vnc server to your raspberry pi, you can begin configuring it.
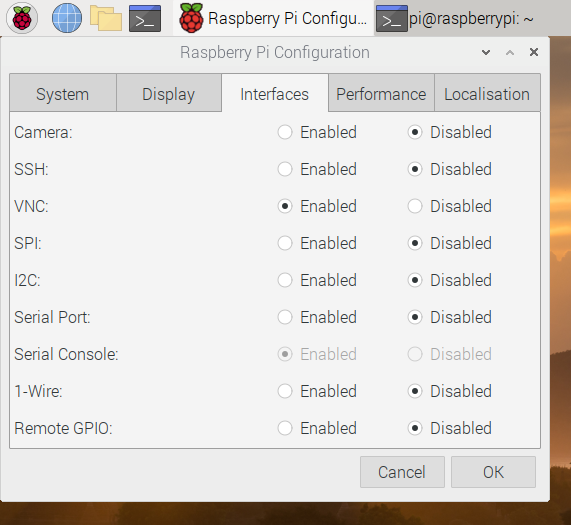
To enable RealVNC on the desktop, navigate to the start menu and open the preferences, and then choose Raspberry Pi Configuration. Within the configuration options, look for the VNC section and enable it. This will typically involve checking a box or selecting an "enabled" status. Alternatively, you can activate the VNC server from the terminal window.
- Unveiling The Power Of Mydesicom Your Ultimate Destination For All Things Indian
- Filmyfly Hub Your Ultimate Movie Destination
You will also want to make sure that you are forwarding the correct port. For example, when connecting to a vnc on display 1 you would use your.ip.goes.here:5901 (instead of your.ip.goes.here:1) if the vnc server was on display 2 you would use your.ip.goes.here:5902. Also make sure that the port you are forwarding is the same as the port on the pi, so if you want to connect to display one you would forward port 5901.
This virtual desktop exists only in your raspberry pis memory.
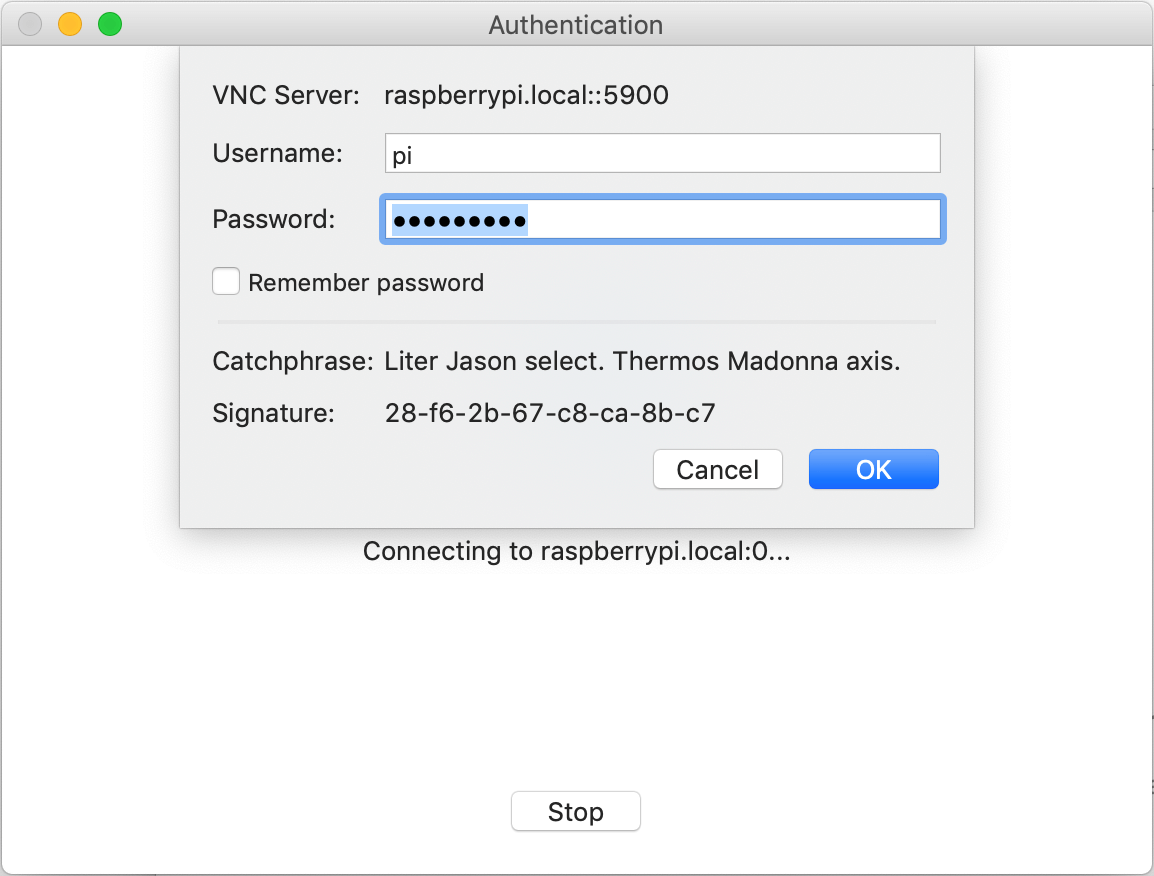
You will also need the client software, which runs on your personal laptop, desktop, tablet, or phone. On the device you will use to take control, enter this information in realvnc viewer. Once this is set up, you are ready to start using VNC.
In cases where your router's configuration options are limited, or if you encounter issues, you might need to delve deeper into the process. If your router doesn't support the above, then it would be helpful for you to explain how the vnc server is started on your pi.
VNC can launch multiple instances on other display ports, like :2, :3, and so on. This port is called a display port and it is referred to by vnc as :1.
With the configuration in place, you can connect to the server from your local machine with the local ip of raspberry pi and port is 5901.
The device you use to access the Raspberry Pi is the client. The client runs on a device you can physically interact with, such as a personal laptop, desktop, tablet, or phone.
The server runs on your raspberry pi. When you use vnc, the client transmits keyboard and mouse events to the server. The server executes those events on your raspberry pi, and returns screen updates to the client.
You can also set up a VNC server on your Raspberry Pi via the terminal. You may want to install packages such as tightvnc server and screen.
To start using VNC, you need to connect to your Raspberry Pi.
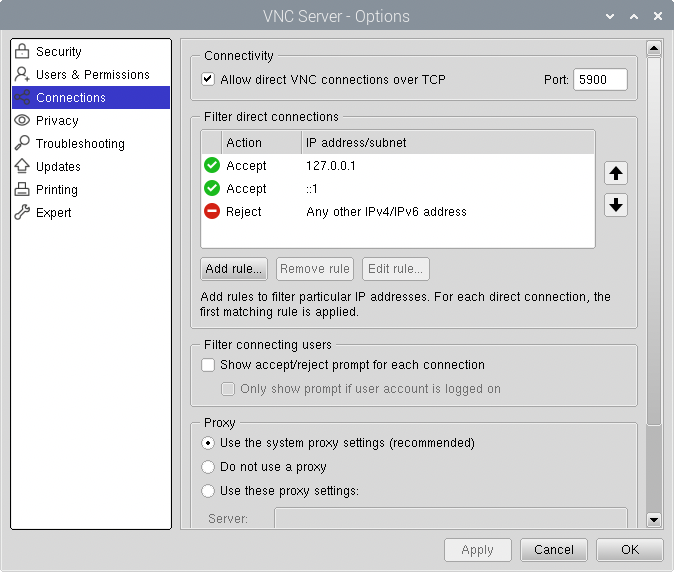
With the server set up, the only remaining step is to connect from a client device. You can right click the vnc icon in the taskbar, go to options, select the connections page and the port number setting is at the top right (on the same line as the allow vnc connections over tcp checkbox). Then the only question is getting your vnc client to use the new port, which should be straightforward.
For the slower raspberry pi's such as pi3b+ and lower will still be using x window enviroment with bookworm so real vnc will still work. This change is required when bookworm is using wayland on the pi4 and pi5.
To start the configuration process, you need to run the command below.
Vnc can be activated in the raspberry pi configuration option. Or from the terminal window using:
If you are looking to set up a remote desktop from the start, VNC is your best option. Using VNC is a perfect way to access your raspberry pi without the need for a monitor, or running a gui. You can also start up the vnc server and specify the desired desktop resolution.
It's essential to prioritize security when using VNC. Hackers actively look for raspberry pi devices with these open ports and default passwords. This is why you must change your password when turning on vnc.
Make sure your password for vnc is not the same as your cci password.
Ssh and vnc involve opening a port on raspberry pi (vnc uses port 5900+n and ssh uses port 22). This potentially exposes your raspberry pi. Do not open your router firewall to allow vnc from the internet.
Remember that the VNC is just a way to access your Pi remotely, and you can use it without the need for a monitor.
Note the remote port number.
Virtual network computing, or vnc, is a way of remote viewing and controlling a computer from another.
VNC can allow you to transform your raspberry pi 4 model b into a powerful computing platform in under 30 minutes.
So the aim here is to install the vnc server software as well as a web based html5 client onto the raspberry pi.
You might have to check port settings on your networking equipment in order to make a connection, but the setup on the raspberry pi is done (see also how to set up raspberry pi remote desktop on windows/ linux/ mac)! Be aware of a few things that could impact this:
Vnc est un outil qui vous permet daccder lenvironnement de bureau distance depuis un autre ordinateur. Sur raspberry pi, lutilisation de vnc est lun des moyens les plus simples dy accder distance. Si vous utilisez raspberry pi os, vnc est prinstall, vous navez donc qu lactiver pour commencer.
If not, and youre already booted into the graphical desktop, select menu > preferences > raspberry pi configuration > interfaces and make sure vnc is set to enabled.
- Www Bollyflix Org In Your Ultimate Guide To Bollywood Streaming
- Innocent Masuku Net Worth The Untold Story Of A Rising African Entrepreneur